“Personal accountability requires mindfulness, acceptance, honesty and courage.” – Shelby Martin
Personal success can be achieved through taking accountability for our actions. This shift takes time and is one I’ve embraced on this health journey. It’s also one I hadn’t embraced in the past. It’s hard to come to terms with the reality that you and you alone are responsible for the decisions you make each day, but personal accountability is the key to living a healthy, fulfilled, and meaningful life. Even though it can be challenging, accepting personal accountability will enable you to learn from mistakes and make adjustments to your journey.
Our consistency and day to day life decisions play a huge role in the progress we make and results we achieve. Believe me, I know it feels better to blame work stress, genetics, health or other outside reasons for my failure to make progress. Blaming others or making excuses can lead to giving up when things get hard. There are certainly cases where outside factors are a key reason one is not achieving results, despite putting in the work. I would never want to minimize that, but, today I’d like to talk about accepting personal accountability for your health journey.
My Journey
I’ve been on this health journey for what feels like a lifetime. I’ve honestly tried everything there was to try. I worked with countless nutritionists who wanted to sell me endless products. Everyone seemed to have their own angle on what I needed to do. I would try what they said, not see results fast enough and give up, then blame them. I believed every advertisement I saw that spoke to those who haven’t had results, but would if they only tried their new approach. I worked out endlessly, ate clean and couldn’t seem to ever stay on track. It wasn’t until I shifted my mindset from doing what someone else said I needed to do, to taking control over my own journey, that I began to have success.
Think about this, every single decision you make in a day is in your own hands. I decide every day whether I will sleep in, get up, work out, eat out or cook. I needed to accept responsibility for the decisions I made. Recognizing and honoring this was a necessary first step toward making lasting changes in my health. It was also a powerful tool toward changing unwanted behaviors and ways of thinking about myself.
Many of us spend our days drowning in negative self talk, blame and procrastination. On this journey toward reclaiming our health, we first need to address the elephant in the room – blame and excuses. Yes, it is far easier to say I’m still overweight because I’m a middle aged woman, or my parents were overweight, or, or, or. Accepting these excuses and reasons for our struggle can lead us to accepting where we are, giving up on trying to change our way of life. I know this first hand, as I had given up on even trying. I began to accept that this was just how I was going to be.
Personal Accountability
Personal accountability is the practice of accepting responsibility for your actions, words, and behaviors, and the consequences that result. It involves taking ownership of situations, and doing your best to improve, whether the outcome is good or bad. People who are personally accountable don’t blame others or make excuses, and they try to make amends when things go wrong.
Personal accountability does not mean we place blame, or shame on ourselves. Rather, it is meant to be a means to accept that despite where you are right now on your health journey, including the reasons for being there, you have the power and responsibility to improve your health and make lasting changes.
Roadblocks
Two of the most common reasons for not achieving our goals can be tied to lack of consistency and not having a strong enough purpose – your why.
Consistency:
I’ve written about the importance of consistency on your health journey. This blog is worth your read – The Compound Effect. Consistency is your super power. Quite simply, the small decisions and moves you make over time will determine your rates of success. It’s a lifestyle, not a diet or program.
This hit home for me once when a doctor asked me about my activity levels. I replied that, I run 3 miles most mornings, swim other mornings and ride my bicycle. She said that’s a great way to start your day, but what do you do for the rest of the day? I had to pause and think. I often sat and read, worked on the computer, binged Netflix, etc. Most of my activity for the day was completed by 10:00 AM each day, leaving me feeling like I had put the work in. Sadly, I was thinking of exercise as something I needed to get done.
Exercise is part of an active lifestyle, not something you do to check off a box on your daily list. The more you move, the healthier you will be. I now move throughout my day, not just in the morning. For example, I take a brisk walk when I wake each morning for about 30 minutes, about 1 mile. I then often relax and have breakfast. A few hours later, I head down to the pickleball courts and play games or practice for about 2 hours. I then cook our main meal of the day and we eat lunch. I relax, do some reading, or computer work and then take my afternoon walk, about 1.5 miles. When I return, I either go down to the pool, or go into town to the beach area. We have a light dinner and I walk with the dog for a bit to end the day. Then it’s either relaxing evening home, or we go out. As you can see, I am moving all throughout the day. You can change the walking to bike riding in the nicer weather, or yoga for pickleball. Honestly, it doesn’t matter what you do, as long as you are consistently moving your body.
Purpose:
MY WHY -Having strong reasons for getting healthy can help improve your focus and drive. Losing weight for a special event, while motivating in the short term, won’t sustain you over the long haul. Generally after the event is over, so is your motivation and drive to continue. Further, we often feel we have achieved our goal and begin slowly to loosen up on our decisions.
Center your purpose around longer term goals to keep you grounded when the going gets tough. In my case, my why is to maintain optimum health as I move into the next phase of my life. When I declare my why I say, “I WILL hold on to my memory and live a long, active life.” This is my motivation and my drive. It pushes me out of bed when I don’t want to get up and exercise. It pushes me to think about what I am putting in my mouth. It helps me hold on to the gains I’ve made these past years and continuously pushes me forward. It helps me not stray far off the path, even though there are bumps along the way.
Next Steps
Success on this journey will require action. This action includes accepting personal responsibility and not allowing yourself to make excuses when you fail to follow through
Here are a few of the ways I have been holding myself accountable.
Planning
They say a goal without a plan is just a dream. Planning is the biggest key to success on any health journey. When I fail to plan, I always end up making decisions that aren’t in my best interest, especially around food choice. Planning for me includes shopping for healthy food, planning for meals and scheduling workouts. Using a calendar and developing a schedule is the easiest way I get my daily workouts in. Blocking out times to move my body has been essential. I wake up, brush my teeth, throw on shoes and go for a brisk walk every day. I do this before I do anything else. It’s now a habit. After lunch, I go for another walk every day. I sometimes bring my phone and catch up with a friend. Build your routines into your daily calendar and you will see improvement in your consistency.
Menu planning and food shopping go hand in hand. If I don’t plan out my meals I end up cooking whatever is easy, not necessarily healthy. Whenever I am off target I know that it means I haven’t been diligent about shopping and planning. I am not a meal prep person, I just don’t like to have the food all prepared for the week. I like to cook easy, simple meals to avoid the one long day of prep. For example, yesterday we ate Miso-glazed Eggplant with Farro . On the table in 45 minutes, delicious and easy. Whichever approach works for you, this area of planning is essential for success.
Share the Journey
Writing this blog over the years has allowed me to share my journey. It’s picked me back up when I’ve fall down and holds me accountable. I find writing very therapeutic, as I work through issues I am facing myself. Making my journey public has held me personally accountable. I can’t write about things others should do if I don’t do them myself. This blog keeps me grounded in my why. One of the best ways to stay strong and focused is to share your journey with a friend or loved one. Find yourself a partner and support each other along the way.
Positive Self Talk
Blame, negativity and excuses are hard to stave off. I’m working hard on using positive self talk to replace them whenever they rear their ugly heads. Find yourself a means to use positivity and gratitude to keep your spirits up. This will be a difficult journey and there will be times when your emotions take over. Having an outlet, or means to keep it positive will go a long way towards keeping you moving forward. I’ve written blogs on this topic, which can be found here Kritajna Hum: I am gratitude, Things I’m Letting Go Of
Tracking Progress
At the gym I always hear this, “What get’s measured gets improved.” Tracking progress will greatly improve your motivation and drive. Don’t just weigh yourself and lament over lack of weight loss. Measure all progress – This week I worked out six out of seven days, Today I ate three healthy meals, I slept through the night, etc. There are so many areas of our life that we can look to for progress. The scale is only one way to track our progress. In past blogs I’ve talked about taking your measurements as an alternative to the scale. Taking photographs is another positive way to see progress. Recognizing our daily and weekly successes helps change our thinking around success.
Move to Live
The more we move, the better we will feel. Movement across the day is an important pillar of my journey. I plan it into each day and have cultivated strong habits around movement. Dr. William Sears clearly states, “sit less, move more, live longer”, which definitely is the plan here. I’ve written a blog post on this topic and you can visit it here – Move to Live. I hope you will take the time to read this and lace up your shoes for a walk.
Reach Out
I hope you are connecting to your current health journey. Moving forward is always our goal. In reflecting on where you are right now, perhaps ask yourself, “What are some ways you currently hold yourself accountable?”, “How do you maintain your positivity?”, “Do I move throughout the day?”, and “Who can I share this journey with?”.
I’m always interested in hearing your thoughts. Please take a moment to share your ideas with me at laurakump@reclaiminghealth.blog, on Instagram or Facebook, or in the comments below. Also, consider sharing this blog with a friend who is on this path with you.
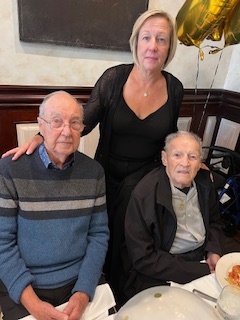 left to right, My Dad (blue shirt, 93), Me, My Uncle (90)