Memory Lane

3BF88176-BDB4-4474-8CBD-137E20BB90EC
Maria & Ludwig

My grandmother Maria was one tough lady.   She had very strong opinions and made them known.   She came to this country with my grandfather Ludwig.  They raised their twins, my mother Else and her brother Walter, in Ridgewood, NY.  My mother and her brother were staying with Maria in Germany at the start of WWII.  Thankfully, they got out in time and returned to life in America.   At that time in New York, Germans were not always made to feel welcome in this country and my mother told stories of being treated unkindly at school.

One piece of Maria’s culture that was passed on to my cousins and I was the art of traditional German cooking.   All of us learned, from watching and helping, how to cook these treasured family recipes.  All of us still produce the holiday meals of our past, though not together anymore sadly.

This past week has found me stuck inside the house, but there are no complaints here. Whenever I’m home, I love to stay in my pajamas all day, read and cook – and maybe have a glass or two of wine.   Nothing soothes the soul like the foods from our childhood.  Food stirs up so many memories of my past through smell, taste and the process of creating these meals feels like being wrapped in love.  Today, I’m making goulash using my updated version of Maria’s recipe.   You see, like most of her generation, Maria never wrote down any recipes.  Else, my mother, tried to replicate the recipes and added her touch to them.  My Aunt Agnes added her input to the recipes along the way. Now, my cousins and I have taken over and added our own tweaks.


320DA4C0-6F8C-4A8E-830F-02190D403845
The cousins 2017

Here’s the most recent version of Maria’s Goulash. If you make it, let me know how you liked it.

Ingredients:
  • 3 – 4 slices of bacon chopped
  • 1 medium yellow onion chopped fine
  • 1 celery stalk chopped fine
  • 2 tbsp sweet paprika
  • Szeged Sweet Paprika Seasoning Spice

  • 2 teaspoons whole caraway seeds
  • 2 pounds grass-fed bottom round beef, cubed
  • 1 1/2 cup bone broth (I use chicken as I prefer the taste)
  • 1 bottle beer (nice German lager)
  • 1 tablespoon red wine vinegar
  • 1-2 cups chopped carrots
  • 2 tbsp unsalted butter
Directions:
  1. Pour a glass of wine for the chef, turn on Alexa for dancing in the kitchen3696CC4B-0446-4256-ABF1-53FED1C597C4
  2. Heat the oven to 275 F.
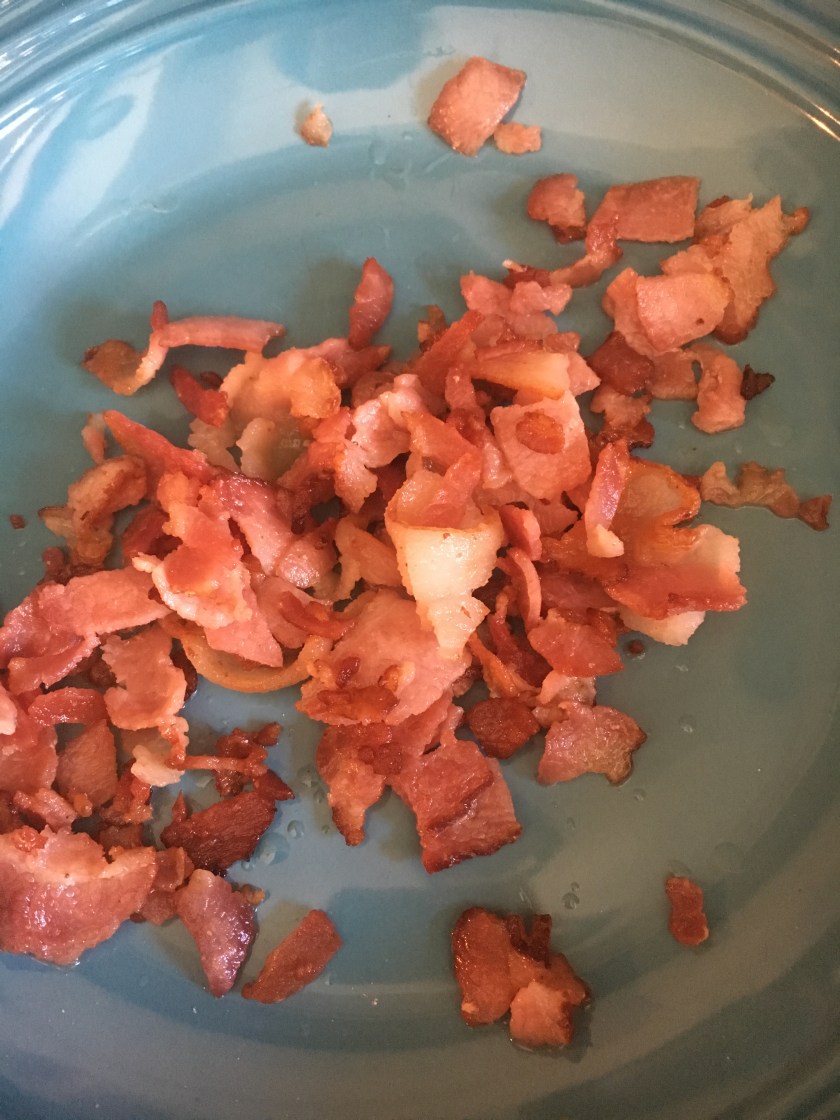
  3. Brown the bacon in a Dutch oven on the stove over medium heat. Once brown remove with slotted spoon and set aside.  399E90FA-26F5-479F-B365-35D9E2755D60
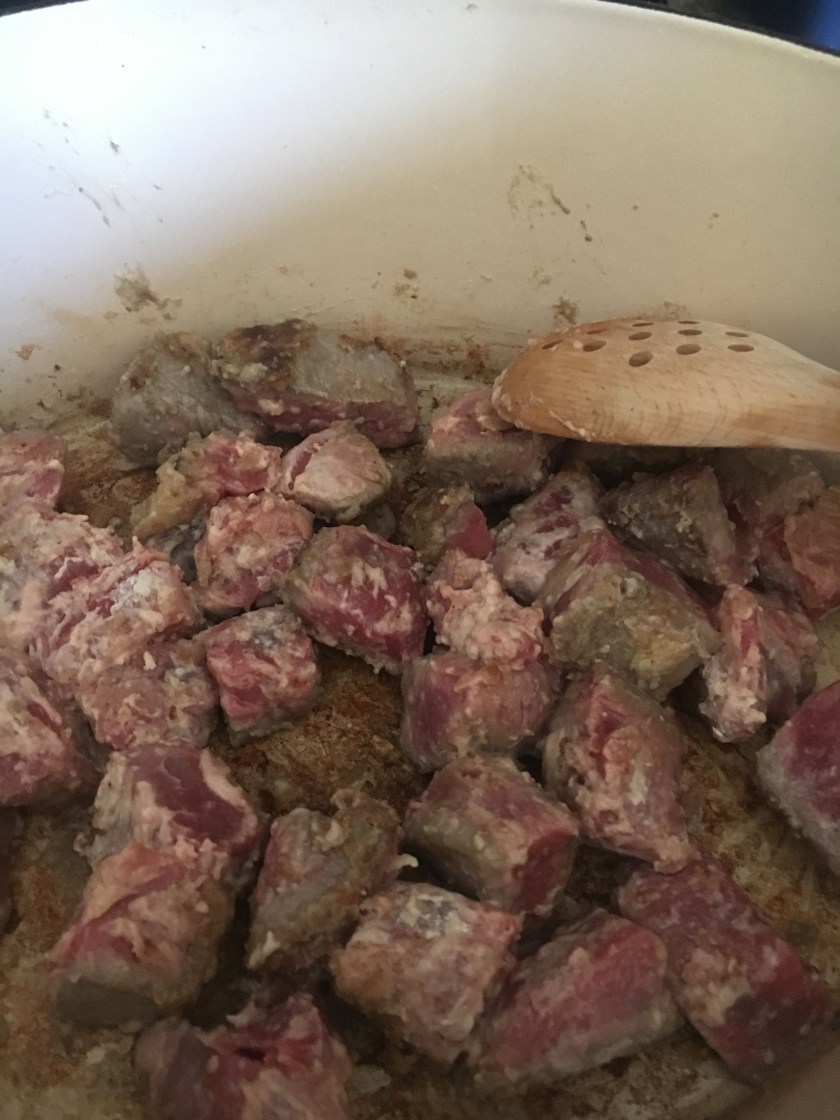
  4. Put meat in storage bag with 1 cup of flour.  Shake to coat the meat evenly.  Place the meat in the cast iron pan with bacon drippings over medium heat.  Stir to brown the meat evenly.  If you need to, add a bit of olive oil to prevent the meat from sticking, but don’t worry it just makes the gravy taste  better.  Once brown, remove the meat and set aside.61B5DF50-0541-4D23-8F67-61E55583C4AE
  5. Put 2 tbs unsalted butter in the same pan (no need to clean in between steps) and  toss in the chopped onion and celery.  Simmer for about 4 minutes.   Turn down the heat to medium-low and continue cooking the onion, stirring from time to time, until the onion browns and begins to caramelize at its edges – about 20 minutes further.FF1126B2-D402-4FED-B78E-63F7918DCE2A
  6. Stir the paprika and caraway seeds into the onion, and then stir in the bottle of beer to deglaze the pot.  Use your wooden spoon to remove any drippings and release back into the sauce. Reduce heat.
  7. Add the cubed beef, broth and vinegar to the pot and continue to stir. Add salt and pepper to taste.  If you want some spice add a dash of red pepper flakes.E3A8A963-D571-427A-BE51-39E1ACA9FEA7
  8. Cover the pot and place in the oven.
  9. Cook 2 1/2 hours, then add the carrots and stir.  Cook another hour, or until meat is tender.  The longer the better!  Add additional broth as needed if it thickens too much, but remember it is not soup.
Spaetzle:
Ingredients:
1 1/2 cup of flour
2 eggs
1/4 cup of milk
1 tsp nutmeg
1/2 tsp salt – optional
Consistency if dough is softer than pasta dough.  It should be pliable.
Though I have an old metal spaetzle press, I rarely use it anymore.  It was hard to press and clean.  This very inexpensive machine has been a lifesaver.  Super easy to use and clean.  Highly recommended.  Click on the picture to see the details.  Fits perfectly on top of my stock pot.

Directions:
  1. Mix flour, salt and nutmeg in a bowl.
  2. Beat the two eggs and add to the flour mix.
  3. Using a fork mix together until thoroughly mixed, and fine bubbles begin to appear.
  4. Heat a stock pot full of water to a boil.  Transfer the spaetzle batter into the spaetzle press over the pot.
  5. Press the batter through into the boiling water.
  6. Remover the spaetzle with a large slotted spoor, or drain in colander when it begins to float.  Only takes a few minutes.

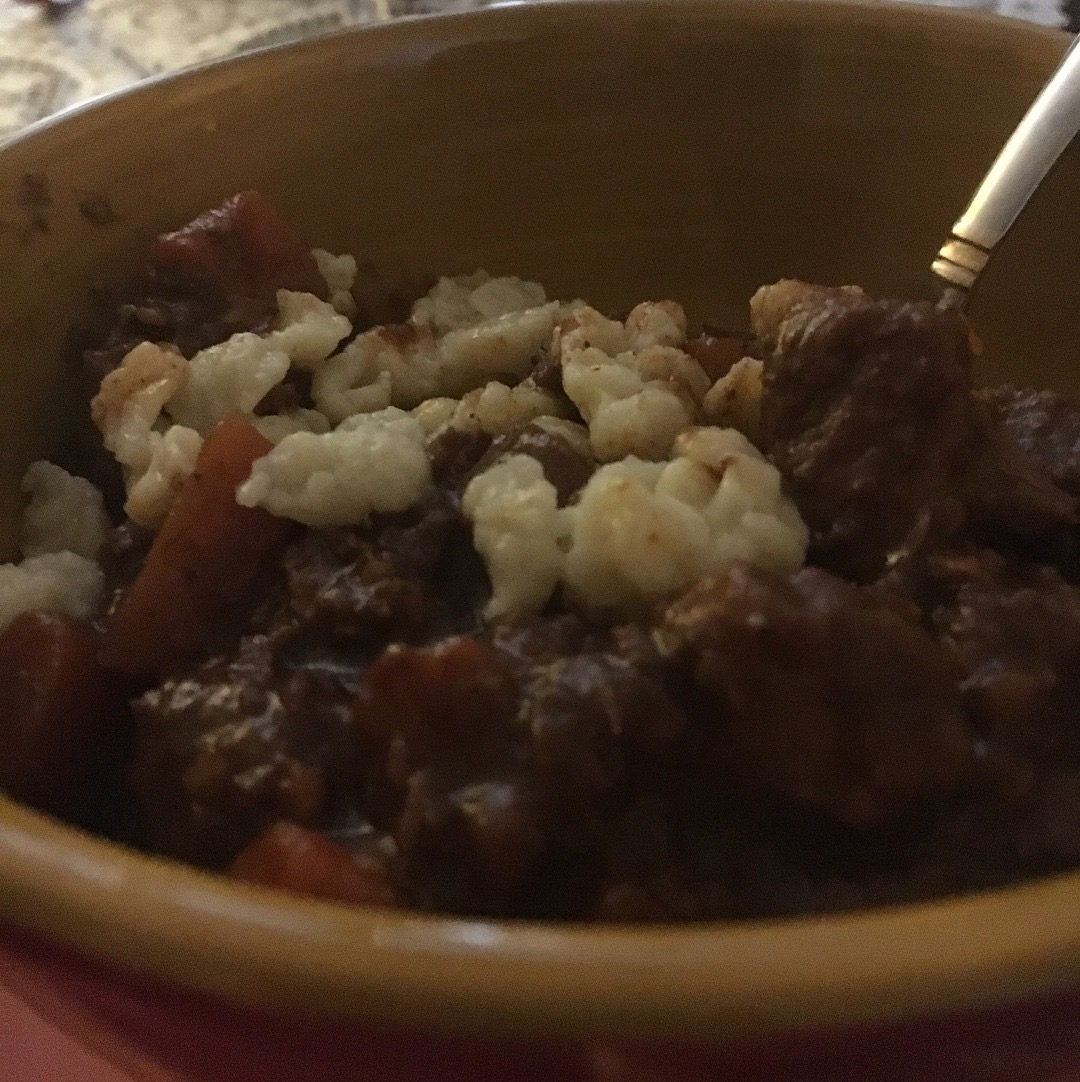
Plate the spaetzle in a large pasta bowl.  Top with goulash.  Enjoy this meal with an ice cold German beer, or a nice glass of red wine.

What recipes do you make that are family treasures?  Please leave a message below and I’ll give the a try.

Advertisement

Avocado Oil

People tout the many health benefits of using coconut oil.  Some even suggest eating it as a super food.   Others say you should swap it for your olive oil when cooking, or on salad.  I tried cooking with coconut oil and noticed it changed the taste of my food.  Coconut oil has a very distinct flavor and using it in my recipes changed the taste of my meal and not always for the better.  Even in my super food coffee, I noticed a different taste when using coconut oil.  This sparked me to start researching oils to see what other options were available to me.

Cold pressed olive oil is still a staple oil in my home, but no longer my first choice.  In my personal opinion, the best choice for a healthy oil is avocado oil which is produced from the avocado fruit.  This oil is made from the pulp surrounding the pit, not the seed.  Avocado oil doesn’t have a strong flavoring that overpowers, or competes with the flavor of foods.  It also has a high smoke point which makes it ideal for cooking.

When choosing an oil for cooking it is extremely important to learn about its smoke point.  This is the temperature at which your oil begins to smoke in the pan.  Healthy oils, like olive oil, can become unhealthy when they reach their smoke point because it begins to break down and nutrients are lost.  Further, dangerous compounds can be created which are detrimental to your health.  I always used olive oil in my cooking and had no idea about this!  I no longer use olive oil for cooking and have replaced it with avocado oil.  Unlike coconut oil, this oil does not overpower my food.

When using any oil for cooking, it is very important to consider the smoke point (the temperature at which the oil starts to be visibly smoking in the pan) of the oil. Even a healthy oil like benefit-rich olive oil becomes unhealthy when it reaches its smoke point. When an oil reaches its smoke point, the structure of the oil begins to break down, nutrients are lost, flavor is changed and most dangerously, compounds can be created that are damaging to your health. Avocado oil’s high smoke point make it a top choice for any frying, browning or sautéing recipes.

I use avocado oil on my salads, as well as cold pressed olive oil.  I find the oil to be very versatile and it has become my go to oil for cooking.  Further, there are said to be many health benefits to using it including improving heart health, lowering cholesterol, arthritis support and skin care.  I buy my avocado oil online, but I have seen it available in Costco.  I don’t like to purchase super large containers of oil as I prefer my oil to be fresh.  I also don’t purchase oils in plastic containers ever!

Spend some time learning about the oils you use.  I think you will be shocked by what you learn.  I never knew there were so many different types of oils, or the dangers of using the wrong oil for cooking.

What type of oil are you using?  Please share your experiences below.

Avocado Oil I Use:

Recipe Swap – Pulled Chicken Sliders

Recently I tried pulled pork sliders while out for dinner.  I’m not a fan of pork or barbecue sauce, but will admit to loving that slider appetizer.  I’ve been thinking of it since and decided to spend some time trying to recreate it.  I also wanted to update it to try and make it slightly healthier.

My first swap was the meat.  While I enjoyed it out I prefer chicken to pork, so I decided to use pulled chicken.  We happened to have a half of a roasted chicken from Sunday, so I began shredding the white meat for sliders.  I also made some spicy coleslaw to top the sliders, as they did at the restaurant.  You can eat the meat without the buns if you are gluten free, or use romaine lettuce for your bun.

With use of left over chicken, this became a super easy, quick weeknight dinner.   And it was delicious!

Pulled Chicken Sliders

Ingredients

1/2 cup ketchup
1 tablespoon dark brown sugar (I used coconut sugar)
1 tablespoon cider vinegar
1 teaspoon chili powder
1/2 teaspoon garlic powder
1/2 teaspoon onion powder
1/2 teaspoon dry mustard
1/2 teaspoon smoked paprika (this is a fabulous spice)
1/2 teaspoon ground cumin
1/8 teaspoon ground allspice
2 cups shredded skinless, boneless chicken breast (organic hormone free rotisserie or slow roast is best)
8 sliders mini buns

Directions

  1. Combine first 10 ingredients in a small saucepan over medium heat. Bring to a simmer; cook 3 minutes or until slightly thick, stirring occasionally.
  2. Add chicken to ketchup mixture; stir to combine.
  3. Cook 2 minutes or until chicken is thoroughly heated.
  4. Spoon onto slider buns
  5. Top with spicy coleslaw

Recipe Swap – Creamy, Spicy Coleslaw

Recipe adapted from MyRecipes.com

If you want a little more heat, feel free to add a dash of hot sauce to your mix.  I was happy with the heat from the coleslaw.

Let me know how you like it if you make it!  If you have a pulled pork or chicken sandwich recipe to share, please leave comments below.

Recipe Swap – Chicken Pad Thai

I’ve been branching out and trying new recipes that I’ve never cooked before.  I’ve heard so many good things about Thai food, but have yet to try it.  I saw an easy recipe that I thought might be something I’d enjoy.  I decided against purchasing a ready made Thai sauce as I was unable to pronounce many of the ingredients listed on the label.  I used a recipe for homemade Thai sauce found below.  I did not include noodles, but I’m sure you could.  The recipe was super easy to follow and quick!  The whole process took about 30 minutes.  It will be perfect for a work night stir fry and no I don’t have a fancy wok – yet.  The taste of this was delicious, but it was a bit hot which I love.  I’m thinking the heat came from the serrano pepper and not the sauce, so go easy on that if you prefer it milder.

Pad Thai Sauce:

Ingredients:

  • 2 tbsp coconut yogurt
  • 3 tbsp. ketchup
  • 1 tbsp. coconut aminos (healthier alternative to soy sauce)
  • 1 tbsp. raw honey
  • 1 tsp. organic hoisin sauce
  • 1⁄4 tsp. sesame oil
  • 1⁄2 tsp. garlic powder
  • 1⁄2 tsp. organic ginger (I used minced ginger in jar)
  • 1⁄2 tsp. black pepper
  • 1⁄2 tsp. organic cilantro
  • 1⁄2 tsp.  no-salt seasoning

Directions:

1. In a bowl combine all ingredients and set aside until needed for your stir fry.   Copyright © 2016 Danette May and Mindful Health, LLC

Chicken Stir-Fry:

Ingredients:

  • 4-6 oz. chicken, cubed
  • 1 small serrano pepper, minced
  • 2 tbsp. Pad Thai sauce
  • 1 cubed organic zucchini
  • 1 chopped organic red bell pepper

Directions:

  1. In pan, add 1 tsp. extra-virgin olive oil, zucchini, red bell pepper, chicken and minced Serrano pepper. Cook until chicken browns and is fully cooked. (I actually had leftover grilled chicken that I cubed so it was done real fast.  I cooked the vegetables for a bit first, then added the cooked, cubed chicken to warm.)
  2. Add pad thai sauce.
  3. Stir and warm.

Copyright © 2016 Danette May and Mindful Health, LLC

This was a meal by itself, no sides required but you could make a nice garden salad with it.  Be sure you have something to put out the fire in your mouth.  I drank ginger kombucha.

If you try this recipe, please let me know how you liked it.  It was part of a 30 day meal program I participated in recently with Danette May.

Some ingredients needed:

Nutrifera Organic Coconut Coconut Aminos 12.7 fl oz (375 ml)

Lee Kum Kee Hoisin Sauce, 20 oz


NoSalt Original Sodium-Free Salt Alternative 11 Ounce (Pack of 2)


Recipe Swap – Creamy, Spicy Coleslaw

I am a recent coleslaw lover much to the surprise of my husband who has spent 34 years hearing me say otherwise.  He’s feeling sad thinking that when we go to a diner I will no longer give him my share of it.  He really shouldn’t worry though because I won’t be indulging in a mayonnaise laden version of this staple side dish anytime soon.  I have tested a few healthier, lighter versions and found one that I’m especially loving so I’ll be eating my coleslaw right here in my home.

My first taste of coleslaw came recently at a dinner out.  It was on top of a pulled pork slider and man was I sold on it after the first bite.  I haven’t tried the pulled pork recipe hunt yet, but quickly got after a coleslaw recipe I’d enjoy.  Here’s what I’ve settled on for now.  Spicy, tangy and crunchy while reducing some of the mayonnaise fat.  I served it last night on top of some grilled chicken and boy was it a hit around here.

Spicy Coleslaw Recipe

  • 4 cups shredded cabbage (I used green already shredded organic coleslaw mix)
  • 1 cup shredded carrots
  • 1 medium onion sliced
  • 6 oz cottage cheese (I used goat cottage)
  • 1/4 cup mayonnaise
  • 1/4 cup dijon mustard
  • 1/2 tsp cayenne pepper
  • 2 tsp apple cider vinegar
  • 1 cup coconut sugar ( I guess this could be optional but I used it)
  • Optional – add sprinkle of hot sauce (I didn’t but I will next time!)

Directions:

  1. Mix the cottage cheese, mayonnaise, mustard, cayenne pepper, vinegar, sugar until combined well.
  2. Begin to add the shredded cabbage until well coated.
  3. Chill covered for at least 2 hours.

I have some leftover right now in my refrigerator and can’t wait for lunch to crunch on some.  If you try this recipe, or have a version of coleslaw to share, please post it in the comments below.

Ingredients used in this recipe –

Natural Value Organic Sriracha Chili Sauce, 18 Ounce

I have to hide this from my husband who puts it on everything!


NOW Foods Organic Coconut Sugar,16-Ounce

Healthier option for recipes that call for sugar.  It is still sugar and should be used sparingly, but it does have a lower glycemic index.


Recipe Swap – Skinny Latte

My obsession with coffee quickly led to rapid weight gain.  Of course, I fell in love with mocha lattes, the ultimate sugar and fat laden beverage.  I was told by my friend to “go easy” on the stuff and of course I didn’t listen.  It was just that good.  Today I want to share an easy to make at home version of my favorite coffee shop latte.  It’s worth the time to make because it’s super delicious.

I don’t drink these every day, but when the craving comes upon me I take a moment to make and savor this truly delicious, coffee shop worthy, latte.  Coffee and chocolate, for me, are always a match made in heaven.

Skinny Mocha Latte

Ingredients

  • 3 TBSP. good quality unsweetened cocoa
  • 2 TBSP. coconut sugar
  • pinch salt
  • 1/3 cup water
  • 1/4 tsp. vanilla
  • 2/3 cup skim milk

Directions

Boil some water. Keep warm while you make the latte. Have 2 8-ounce coffee mugs standing by
1. Place everything except the vanilla in a saucepan. Place over medium heat and bring to a simmer. Cook for 5 minutes, until mixture thickens
2. Add vanilla and whisk to combine
3. Make the latte: If you have an espresso maker, brew one shot. If you don’t have one, just brew a couple of cups of strong coffee. Place espresso or brewed coffee in an 8-ounce mug and add 2 TBSP. of the mocha syrup. Stir until the mocha syrup is well incorporated. add 2-4 TBSP. of boiling water (depending on how strong you like your coffee) and set aside
4. Heat the milk in a saucepan over medium heat, just until is starts to simmer
5. Pour equal amounts of the milk into each mug, stir well to combine. YUM!

Recipe shared by thereciperedux.com

If you want to get fancy and froth your milk it’s super easy to do and for me worth the extra step.  I use a hand held frother for this recipe.

  Elementi Original Premier Milk Frother with Stand (Red) | More Powerful High Torque Motor – Make Cappuccinos, Lattes and Bulletproof Coffee

If you decide to make espresso, in place of strong coffee, there’s a simple press that I use. I just don’t have the room for an espresso machine, though I do longingly admire them. As an added bonus, this press is portable so you can have a quick cup of latte at work too.  So easy to use and clean!

Aeropress Coffee and Espresso Maker

Another option for frothing is to just pour your mixture in a high powered blender, such as Vitamix and whip it up. I prefer the handheld option to this though as it’s so much easier to clean up after leaving more time to sip and savor your coffee.

I hope you give this delicious treat a try. Let me know how you like it!

Recipe Swaps

When I first gave up drinking dairy milk, I switched over to store bought nut milks.  While there are many healthy options available, I soon learned just how easy it is to make these milks at home.  I was excited by this as I love to cook and wanted to have control over what is actually in my milk.   As an added bonus, I am never without fresh delicious nut milks to use in my smoothies and/or meals.  When you find out just how simple it is to make, I believe you will join me in whipping up a fresh batch.

Things you need to have on hand to make fresh nut milks at home are nuts (any type you wish to use), cheesecloth or what I bought – a nut milk bag (to strain the milk) and glass jars (to store milk).

My favorite recipe:

Cashew Nut Milk (My favorite nut milk)

Ingredients

  • 3/4 cup raw unsalted cashews
  • 3cups filtered water, plus more for soaking cashews
  • one whole pitted date
  • 1/2 tsp vanilla

Instructions

  • Place cashews in a bowl and cover with water (I use filtered water to soak)
  • Soak cashews for at least 4 hours (overnight is best)
  • Strain the cashews and add to your blender, along with the date and vanilla
  • Slowly add clean filtered water to your blender and blend until you reach desired consistency.  I like mine creamy, so 3 cups works.  If you like yours thinner, just add a little more water until it’s the consistency you want.
  • Strain the milk through a nut bag, or cheese cloth into your glass jar. (You can actually eat the strained creamy thick paste if you wish.  It’s a healthy, tasty snack.  Sprinkle with a bit of cinnamon and add some fruit.)
  • Store milk in refrigerator in your glass jar for up to 3 days.

This recipe can be used with any nut.  I’ve tried almond, pecan and cashew.  Cashew is my personal favorite, but they’ve all been delicious.  I use whatever nut I have in the house at the moment I want milk.  My daughter has now switched over as well and loves using this in her macaroni and cheese recipe.

Here’s the supplies I use:

Pro Quality Nut Milk Bag – Big 12″X12″ Commercial Grade – Reusable Almond Milk Bag & All Purpose Food Strainer – Fine Mesh Nylon Cheesecloth & Cold Brew Coffee Filter – Free Recipes & Videos (1)

Libbey Glass Milk Bottle with Lid – 33.5 oz


I am a huge fan of simple, easy cooking.  I was surprised and excited when I learned how easy making nut milk at home was.  I’m hoping you’ll try it.  Let me know how you like it!

Homemade Revisited

As I sit here watching the morning news, I’m reminded of why I prefer to make my food from scratch.  This morning there are several recalls of food products.  Some are more disturbing than others and should be a reminder as to why it is important to have control over what goes into your food.  Apparently, there are golf ball pieces in packages of frozen hash browns, salmonella on chips and what the soup can says is not what was found inside.  These issues serve as a stark reminder of why taking back control over our food sources is critical.

I work long hours and totally understand the appeal of purchasing frozen foods for ease of cooking.  But when I hear of these types of situations, it increases my commitment to control as much as I can when it comes to my food.  Hash browns, for instance, are merely made from potatoes, onions and peppers.  Super easy to cook yourself and then freeze for later use.  Doing this would avoid the large production plants in which ready made versions come from, in which we wonder this morning about the quality control.  What else is in our food that we are totally unaware of!

Recently, I read about someone who found a bat inside a popular salad mix.  I would literally die if I opened my bag of salad and found a dead bat!  This morning, I’m hoping we all consider what we are buying for convenience that could possibly be replaced, like bagged salads, canned soups and frozen hash browns.  All of these items are easy enough to assemble at home to avoid mass production assembly lines.

Here are my suggestions for making this type of change to your food pantry.

Canning Food

Items like soup that come in cans are generally filled with sodium and lord knows what else.  Soup is such an easy meal to prepare at home, but not something you might have time for after a long day at work.  Luckily soup is an easy to cook ahead store meal.  You can purchase glass food storage jars and seal the soup for months in your pantry.  Or, you can place it in freezer safe storage containers and store in your freezer.  Making a large pot of soup on the weekend is super easy as it’s they kind of meal that can slow cook in the crockpot, or on the stove.  Once cooked, you divide the soup into several glass jars, seal and store.

The process of canning is fairly simple. You fill a clean jar with prepared food, apply the flat lid and the threaded ring to the jar and submerge the filled jar in boiling water.  The time for boiling depends on what you are canning and is the process that creates an airtight seal, keeping food safe for extended periods of time.  These are the jars I purchased when I was canning tomatoes.  This morning I went down the basement and brought them back up.  I plan to wash, sterilize and prepare for use again.

Ball Pint Regular Mouth Jars and Lids BPA Free, 16 oz, Set of 12

DIY Prepared Frozen Food

Open your freezer and look at what types of frozen foods you are purchasing.  Are there any, like the hash browns on recall, that you could possibly make yourself?  Hash browns are a perfect example of an easy to make and freeze food.  Cooking these at home and placing in freezer storage bags or containers when cooled give you homemade goodness ready to grab and heat.  I took stock of my freezer this morning and I have lots of frozen organic vegetables and fruit for use in smoothies.  I started purchasing them when I got tired of throwing out food that we didn’t eat fast enough.  I also have baggies with cut up banana and fresh blueberries.  This reminded me that I can purchase and freeze fresh vegetables to avoid waste.  I just need to invest in some extra freezer storage bags to place them in.  They may not store quite as long as the store brought variety, but I don’t need to store them long.

I have seen food storage machines at Costco in the past and am wondering if I should pick one up for freezing vegetables and fruits. I think this would help them maintain their crisp color and avoid any danger of freezer burn. This one looks affordable and might be an investment I make.

FoodSaver V2244 Vacuum Sealing System with Starter Kit

Thankfully, if I am the person putting the fruit and vegetables in the bag, I’d be completely sure there are no extra critters inside my bags!

Make Your Own Salad Bags

The reason most of us purchase ready made salad bags is convenience.  I’ve had many a morning where I didn’t bring salad to work because I didn’t have time to wash, chop and assemble it.  Food prep will avoid this, but once you wash salad it begins to go bad if you don’t eat it.  I used to have a salad spinner that dried the salad after washing.  I may have to dig that out of my basement as well.  This way I would wash it, spin it, assemble it and store it.  Purchasing the Romaine lettuce whole is also more cost effective.  I could purchase my lettuce, wash and inspect, dry and assemble for the week in separate containers.  The trims can be added as needed to ensure freshness.  Most of the trims are easy enough to grab and go.  This is the type of spinner I have and I think I’m going to see if it dries it enough to stay fresh for the week.

Westmark German Vegetable and Salad Spinner with Pouring Spout (Green)

I’m excited to get back to my routes and rethink some of my food preparation practices.  I wish I had the time to grow my vegetables again, but I know I can’t maintain the garden properly.  Making these simple changes will get me closer to that and hopefully avoid unknowingly eating items such as golf ball pieces in my food.

What are your thoughts on these recalls?  Are you as sickened as I am?  Will you give these types of suggestions a try?  If you do, let me know how it works out for you.

Snap Out of It

Well this has been a rough week for me when it comes to healthy eating.  My birthday was Wednesday so there was some eating of cookies and cake during the day at work, followed by dinner out and some wine.  Then Thursday was a late night at work so we ordered dinner in – Chinese food.  Friday was a night out for dinner at a yearly PTA function which involved more wine and restaurant food.  While I didn’t over eat at any of these events, my body is just not used to eating in this manner anymore.   I’m feeling lousy because my eating routine is totally off kilter.  I’ve been eating out, not home cooked, so I feel sluggish and tired.  I feel like I’m full of salt, chemicals and wine.  I need to snap out of this and get back on track, but I’m not feeling motivated right now to even move.  My bed is so comfy and cozy and it’s cold and dark outside right now.  I have a scheduled slow, long run today and I’ve yet to move.  I feel like slapping myself and yelling, snap out of it girl.

I think I need to do some detoxing this week to get myself clean and restart my mojo.  It’s so amazing how much difference a week of unhealthy choices can make on my overall feeling of health.  I’m tired, bloated and totally lacking motivation.  I feel myself struggling hard to get back on track.  I know how easy it would be to just say forget it and continue on this path, but I just can’t let myself do it.  I have got to get myself back on track and quickly.  It seems to take me six months to lose 10 pounds, but I can put them back on in less than two weeks.  Funny how life works sometimes, right.

I’m not a fan of pills and drinking powdered shakes when detoxing.  I am a firm believer in nutrition and using the power found in food itself to get myself back on track.  I am going to pull out a 10 day green smoothie cleanse I used a few months back and give that another round.  Yes, this plan does involve drinking smoothies, but they are filled with delicious vegetables and super foods, not powders and expensive products.

10-Day Green Smoothie Cleanse

This cleanse is super easy to follow.  I do the modified version which involves drinking two green smoothies a day (breakfast & lunch) followed by a healthy dinner.  There are options in the book for the modified version, as well as the full version.  The full version involves drinking three smoothies and eating healthy snacks and drinking tea.  I like to eat food and the thought of ten days without does not appeal to me.  Doing the modified version and substituting breakfast and lunch are super easy for me because then I don’t have to worry about packing lunch.  The author also hosts a free Facebook group, so you can go on and network with other people doing the cleanse. This book provides shopping lists, recipes, and detailed instructions for the 10-day cleanse, along with suggestions for getting the best results. It also offers advice on how to continue to lose weight and maintain good health afterwards. Easy and far less money than purchasing a program!  Many programs will cost $200 or more to get started.  This book is under $10.  You know I’m going to say it, win – win.

This is just the jumpstart I need right now! How about you?  Are you ready to do some internal cleansing?  Do you want to jumpstart your spring healthy eating and just plain feel better?  Then join me in doing the 10-Day Green Smoothie Cleanse!  I’m heading out to do my shopping after my run.  I’m feeling better already and can’t wait to get some healthy food coursing through my body!  If you are joining me, leave a comment below.  I’d love to exchange recipes and good health with you.


Recipe Swap

Sunday sauce is a staple in this house.  We love spaghetti and meatballs and afternoons spent together as a family.  I’ve tried to find ways to update this comfort food without changing it too drastically.  Yes, I have tried turkey meatballs and personally they are not my favorite recipe swap.  I’ve also invested in a spiralizer and make zucchini noodles and spaghetti squash as options to replace the traditional spaghetti noodle.  Both of these are good options for the meal, but I personally am not prevented from eating gluten for any health reasons and do prefer pasta with my Sunday meals most weeks.  Below is my updated version of the traditional spaghetti and meatball dinner.

Bison is a great choice for your meatball dinner.  My family can’t tell the difference when I use bison in place of beef.  I can’t say the same about turkey meatballs.  Grass-fed Bison is a low fat, low cholesterol meat with as many Omega-3s per serving as a serving of salmon.  The taste, texture and color is the same as beef, but this meat packs a nice amount of iron as well.  I order mine online, but am sure you can find bison in any store that has quality meats.  The pricing is very similar to that of beef.  Be sure to always buy grass fed, organic versions of any meats you eat.

Bison Meatballs

Ingredients

  1. 1 egg
  2. 1 pound ground bison
  3. 1/2 cup homemade gluten free bread crumbs
  4. 1/4 cup freshly grated pecorino or parmesan cheese
  5. 2 tbs water
  6. Optional – I finely chop two kale leaves and mix in to sneak in a vegetable serving sometimes.

Directions

  1. Combine all ingredients and form into small meatballs.  Roll them firmly in your hand to ensure they hold together.
  2. Place on tray and cook in oven for 20-25 minutes at 350 degrees to brown.
  3. Remove from oven and drop meatballs into your sauce.
  4. Cook for at least 45 minutes, or however long you like your sauce to simmer.

Homemade Spaghetti

I do not have any gluten sensitivities, but I do try to limit my intake.  When it comes to pasta, I really only eat it once per week.  I prefer to make my own pasta and have an easy to use attachment for my Kitchen Aid that doesn’t require me to roll out the pasta.  I simply drop it into the machine.  You can substitute the all purpose flour for whole wheat and it comes out fine.  You can also find many gluten free recipes, but they do require many ingredients.  This is the actual recipe I use for my pasta.  I prefer that I know exactly what is going into my pasta, all ingredients I can pronounce.

Ingredients

  1. 1 egg, beaten
  2. 1/2 teaspoon salt
  3. 1/2 flour 00
  4. 1/2 cup semolina flour
  5. 2 tablespoons water Add all ingredients to list

Directions

  1. In a medium sized bowl, combine all flour and salt.
  2. Make a well in the flour, add the slightly beaten egg, and mix. Mixture should form a stiff dough. If needed, stir in 1 to 2 tablespoons water.
  3. On a lightly floured surface, knead dough for about 3 to 4 minutes. With a pasta machine or by hand roll dough out to desired thinness. Use machine or knife to cut into strips of desired width.

The above directions are for those who do not have a pasta machine.  I make mine right in my Kitchen Aid with the dough attachment so I don’t have to manually knead it.  I let my dough rest covered for at least 30 minutes.  I then roll into small balls and drop into my pasta cutting attachment.  So simple, so delicious!  Here is the attachment I use on my Kitchen Aid –

KitchenAid KSMPEXTA Gourmet Pasta Press Attachment with 6 Interchangeable Pasta Plates

The white attachment on this machine is the actual unit I have.  I love it and it has made making homemade pasta so easy.  It’s simple to use and clean.  It comes with 6 blades for different shape pastas.

Homemade breadcrumbs – Gluten Free

Toast gluten free bread in oven on sheet tray.  Remove, process in food processor.  Season as you wish.  I just use a slight amount of garlic, pepper, salt and Italian seasoning.

If you try the Bison as a healthier option, let me know how you like it.  My family hasn’t noticed and my daughter is super picky!  Please leave a comment if you have a different recipe swap for Sunday sauce.  It’s one of our favorite meals so I’m always on the lookout for healthier versions.

%d bloggers like this: